
Scanning onto the Desktop App
To scan documents, Docman will use the Docman Desktop App. This will be present and installed on all PCs using Docman. This needs to be the correct version and be linked to the clinical system with the appropriate API credentials. If you click on the filing tile in the top left hand corner you will see on the right hand side of screen the Scan button shown on the action panel. By clicking on the scan button it will start Docman Desktop Services and will connect to the scanner. It will then bring all the pages into the Desktop app and at this point you are able to click on the order you wish to file them in.
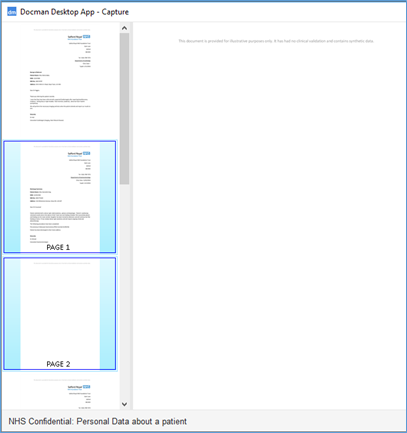
To order and correctly group the pages together for each individual patient, they must be selected in that order by clicking the mouse. The system will then show the number of pages you have assigned, in the order you have clicked on them.
N.B It is important to correctly group the pages whilst in the app before sending to Docman 10 as there is no way to correct this once they are in the Docman 10 system without deleting them and rescanning them back into the system.
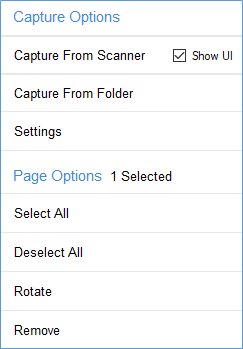
Once you begin selecting the pages you have scanned, you will notice the actions bar appears on the right-hand side. This will now allow you to decide from the options available, what you wish to do with the document.
Capture from Scanner – Allows you to trigger the scanner again, rather than having to close the window and open it again by clicking Scan.
Capture from Folder – Allows you to capture .TIF files from a folder location.
Particularly useful for network scanners.
Settings – Allows you to choose various settings for the Desktop App – See separate article.
Select All, Deselect All, Remove and Rotate allow you to simply action the selected pages on the left-hand side.
The green buttons submit the document to the Docman 10 website in two ways.
If you are Scanning and Filing in one continuous process, select the page(s) of the document you want to file and Click File Document.
File Document
Allows you to immediately submit the document for filing, sending it to Docman 10, applying Intellisense to aid filing and removing it from the Desktop App window.
If you are scanning for someone else to file the documents later, or from another terminal, you can use Send to Folder.
Send to Folder
You can send documents to a folder, these are the folders configured in your Capture & Filing screen in Docman 10.
To send the document to the appropriate folder, you must correctly group the selected pages together in the correct order (as above). Go to the folder button, above the ‘send to folder’ button and click on the dropdown arrow to select the required folder you wish to place the document in.
Click the green button and the document will be moved into the folder of your choice in Docman 10.
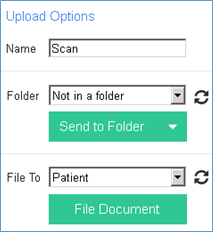
If you have scanned in several single page documents, rather than send each page individually to the folder of your choice, select all the Single page documents from the images on the left. Choose the folder you wish to send them to. And then click on the arrow on the Send to Folder green button.
An option called ‘as individual pages’ will drop down from the green button immediately to the right of the send to folder action button. They will all be moved into the system as individual pages, named Scan 1-?
Allowing them to be filed as individual documents.
Creating Folders
Clicking on Settings and Filing
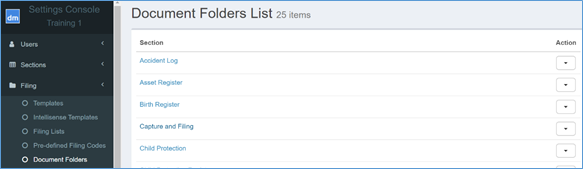
Click on Document Folders and Capture and Filing. Then click Top Level Folder.
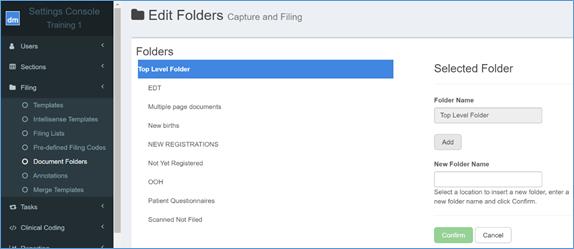
Type the name of the new folder you wish to create. For example, ‘Not Yet Registered Patients’. Click Confirm.
This article has been created by Kelva Barrett (Training and Implementation Consultant)